|
Ready For Concrete
Finally managed to get the two bottom drains fitted along with the pipe work, I decided to go with Spindrift aerated
bottom drains these have 4" drains and a 1.5" air pipe.
So we are all ready for the concrete, which is handy as the concrete is coming early tomorrow morning.
Blocks Arrived.
The blocks arrived today and had them off loaded on to pallets so that the forklift could move them closer
to the pond. This is only part of the load of blocks as there are to many to fit into the barn.
As you can see I have managed to tidy the place up a bit while waiting for the blocks to be delivered.
Now the fun begins in laying all the blocks.
Coming Along
The build is coming along nicely, having got to ground level on two walls.
Ground level is half the total height of the pond, so you feel you are getting close to halfway.
At The Top
Finally managed to get the back and one of the side walls to there finished height, only another two to go before all
the blockwork is finished.
Keeping Warm
Decided it would be a good idea to insulate the pond, I went for 1" thick polyurethane foam sheets, the sheets where
nailed to the blocks with 40mm maisonry nails and where cut to length with a knife. With luck this should help keep the heating
costs down.
Finished
I was undecided on what colour to go with for the flowcoat, but ended up going with black. Now all I need to do
is fit the two aerated bottom drains then I can start filling the pond up.
Halfway
The pond is now half full cannot go any further until I have done all the pipe work.
Starting The Pipe Work
I went with two returns, one from each filter, each return has a Sequence 10,000 pump and a 130,000 heat exchanger.
One of the returns also has a TMC Pro Clear 55 Watt UV.
Still have some pipe work to do but all open pipes from the pond are now connected so I can now fill the pond up.
2nd & 3rd Leak
It seems like it is going to be the week of leaks, I decided to get the system running without connecting the
waste ball valves from the Nexus units, which was just as well as two of these ball valves where leaking when in the closed
position. So had to dump the contents on to the floor to remove the valves so I could tighten the seal on the valve as these
have a screw thread to hold the ball in, I also turned the valves around so I could now adjust them without dumping the contents
first.
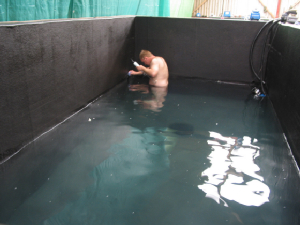
Taking A Swim
I decide to take the plunge and go for a swim, shame I had not managed to heat the water as it was not very warm. With
the water level just below the returns I could see a crack around the return which had the damp blocks below it, so dried
the fibreglass and applied some sealant. Fingers crossed it will cure the problem.
Looking Good
Just finished the woodwork around the top of the pond, which makes a big difference and makes the pond look finished,
but there is still a few things to do as I have not got power to the pond yet as it is running on a extension lead, so thats
the next job. Then I have to fit two overflow boxes to the airline pipes which come from the bottom drains,
so the pond is not quiet full at the moment.
Finished
Sorry for the delay, finally managed to get round to taking a photo of the finished pond.
Koi
A few of the koi enjoying there new pond.
Pond Update
Just a quick update to say that everything is running well and I am very pleased with how the pond is performing.
The above photo shows my koi at 7 feet deep.
I decided it was time to improve the filteration system
on the pond, the Nexus 300's are doing a great job, but I wanted a system which is maintenance free. So I have
now fitted a Drum Filter.
I have been running the 1st drum filter for about 6
months and the clarity of the water is stunning, so I have made the decision to upgrade the drum to a larger model, as I would
like to pull more water through the unit.
The pond has been running with two sets of bakki showers
since I fitted the 1st drum filter, but I have been wanting to fit a 3rd set of bakki showers for sometime and finally
got round to fitting the third set. I always like to have plenty of filteration on a pond as this always gives me scope
to increase the amount of koi I can keep in a pond.
|